 Pin it
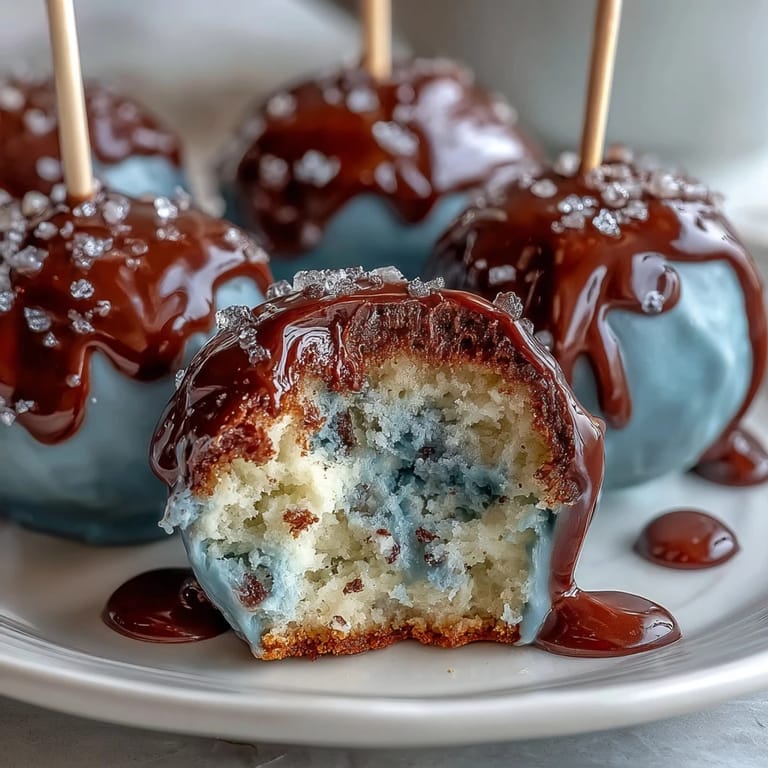
 My sister texted me a photo of robin eggs she found in her garden, and honestly, I stared at that blue for twenty minutes before deciding I needed to capture it in cake form. Spring baking can feel predictable, but these little pops changed that for me—they're whimsical without trying too hard, and they disappear from dessert tables faster than you'd think. There's something about a bite-sized treat that makes people actually slow down and enjoy the moment instead of rushing through.
I made these for my neighbor's spring gathering last year, and I watched her eyes light up when she saw them in the presentation box—the blue was so perfect it almost didn't look real. A little kid asked if they were safe to eat, which tells you how convincing the robin egg effect actually is. That moment made all the fussy dipping and speckling worth every second.
Ingredients
- Vanilla cake mix: A box mix works perfectly here because you're crumbling it anyway, so don't stress about making it from scratch unless you really want to—the frosting is where the love lives.
- Unsalted butter and powdered sugar: These two are your binding agents and flavor base, so don't skimp on quality butter; you'll taste the difference in the frosting's richness.
- Milk and vanilla extract: The milk loosens everything to the right consistency, while vanilla acts as the unsung flavor hero that ties the whole thing together.
- White candy melts or white chocolate: Candy melts are more forgiving for dipping because they set faster and smoother, though real white chocolate tastes better if you're patient with tempering.
- Blue gel food coloring: Oil-based is non-negotiable here—water-based will make your chocolate seize and separate, which I learned the hard way and would rather you didn't.
- Coconut oil or vegetable shortening: This thinning agent is optional but genuinely helpful if your coating gets too thick; a tablespoon makes dipping so much easier.
- Cocoa powder and vodka or extract: Mix these into a paste for the speckled detail that makes them look authentically speckled like real eggs.
- Lollipop sticks and Styrofoam block: The sticks are your handles, and the Styrofoam is your drying station—no fancy equipment needed.
Tired of Takeout? 🥡
Get 10 meals you can make faster than delivery arrives. Seriously.
One email. No spam. Unsubscribe anytime.
Instructions
- Bake and cool the cake:
- Follow your cake mix package directions, then let that cake cool completely on the counter—this matters because warm cake won't crumble properly and will stay too moist. Patience here prevents frustration later.
- Make the frosting:
- Cream your softened butter in a medium bowl until it's pale and fluffy, which takes about two minutes with an electric mixer. Gradually add the powdered sugar, milk, and vanilla, beating until you have something that looks like clouds—smooth, thick, and totally lickable.
- Combine cake and frosting:
- Crumble your cooled cake into fine pieces (almost breadcrumb-like), then add frosting slowly while mixing with your hands until it holds together like soft play-dough. You might not use all the frosting, and that's completely fine.
- Roll and chill the balls:
- Scoop about a tablespoon of mixture for each pop and roll them between your palms until they're smooth and uniform in size. Freeze them for fifteen minutes so they're firm enough to handle the next dipping step without falling apart.
- Melt and color the coating:
- Use either a double boiler or the microwave in twenty-second bursts, stirring between intervals until your white chocolate or candy melts are completely smooth. Add blue gel food coloring drop by drop, stirring until you reach that perfect robin egg shade—it's a blue that's just slightly muted and sophisticated.
- Insert the sticks:
- Dip each lollipop stick into the melted coating first, then push it halfway into a frozen cake ball—this glue-like layer keeps the stick secure. Refrigerate everything for ten minutes so the coating hardens and nothing spins or falls off.
- Dip into the blue:
- Take each cake pop and fully submerge it in the blue coating, then gently twist and lift it out, letting excess drip away. Stand each one upright in your Styrofoam block and let them set completely.
- Add the speckle detail:
- Whisk cocoa powder with a little vodka or clear extract until you have a thin paintable consistency, then use a clean brush to flick tiny specks across each blue surface. This is where the magic happens—suddenly they look like actual robin eggs.
- Final setting:
- Let everything sit at room temperature until the coating is completely firm and the specks have dried. This takes about thirty minutes but it's worth the wait.
 Pin it
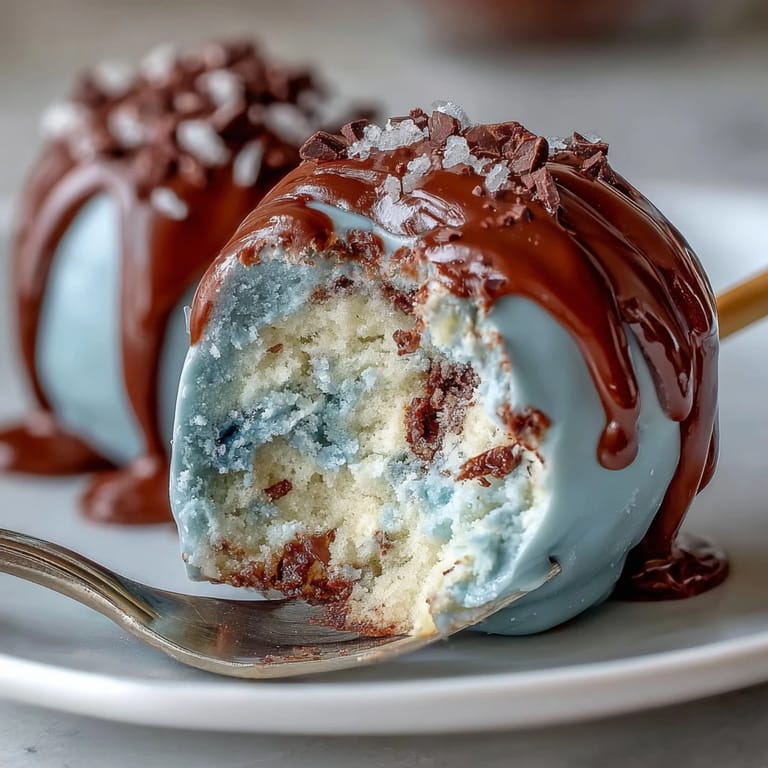
 There's a specific joy in watching someone pick up one of these pops and pause because they're genuinely unsure if they're edible at first—that split second of delighted confusion is the whole point. They're festive without being over-the-top, and they taste like spring feels.
Flavor Variations Worth Trying
While vanilla cake and plain frosting are the perfect base, I've had wonderful success swapping the frosting flavoring around depending on what I'm in the mood for. A teaspoon of almond extract adds this subtle, sophisticated note that makes people try to guess what they're tasting, and lemon zest mixed into the frosting brings brightness that feels particularly spring-like. You could also add a hint of coconut extract if you want something more tropical, though that pulls the robin egg theme in a different direction—still delicious, just different.
Storage and Make-Ahead Wisdom
These are actually perfect for making a day or two ahead, which is why they're such a solid choice for entertaining. Keep them in an airtight container at room temperature for three days, or refrigerate them for up to a week if you want them to stay fresher longer. Just know that refrigerated pops will be slightly firmer and have a more snappy chocolate coating, which some people prefer anyway.
Presentation and Serving Ideas
The beautiful part about cake pops is that they're already restaurant-ready without any extra effort—just remove them from the Styrofoam and arrange them on a cake stand, in a box, or tucked into a small vase for a clever centerpiece. They fit perfectly into those clear cellophane bags tied with ribbon if you're gifting them, and they photograph like they belong in a magazine. Here's the real secret to making them look effortless at any gathering:
- Arrange them in odd numbers on your serving platter for a more natural, less staged appearance.
- If any of them have tiny imperfections in the coating, that's actually charming and makes them look homemade in the best way.
- Keep them in a cool spot away from direct sunlight so the blue doesn't fade and the chocolate stays glossy.
 Pin it
 These robin egg cake pops have become my go-to spring dessert because they make people genuinely happy, and that's what good food is supposed to do. Make them once and you'll understand why they're worth the little bit of effort.
Recipe FAQs
- → What type of food coloring is best for coating?
Oil-based gel food coloring is recommended to prevent the chocolate coating from seizing and to achieve the smooth robin's egg blue color.
- → Can these pops be made gluten-free?
Yes, by using a gluten-free cake mix and ensuring all other ingredients are certified gluten-free, these treats can accommodate gluten-free diets.
- → How do I create the speckled decoration?
Mix cocoa powder with vodka or a clear extract to form a thin paste, then flick the mixture over the coated pops using a small food-safe brush for a speckled effect.
- → What is the best way to store these cake pops?
They can be stored at room temperature for up to three days or refrigerated for up to a week to maintain freshness and texture.
- → Can I add different flavors to the frosting?
Absolutely; try incorporating lemon or almond extract into the frosting for a unique twist that complements the overall flavor.