 Pin it
 I'll never forget the first time I made chili con carne on a bitterly cold December evening. My kitchen filled with the most incredible aroma as the beef browned and the spices bloomed—cumin, chili powder, and paprika dancing together. That night, when friends arrived shivering from the cold, one bowl of this hearty stew was all it took to warm them from the inside out. Since then, it's become my go-to recipe whenever winter settles in, the kind of dish that tastes even better the next day.
There's something almost meditative about standing at the stove, watching those beef cubes transform from raw to richly browned, knowing you're building layers of flavor that will warm everyone at your table. I remember my sister taking her first spoonful and closing her eyes in that way people do when food truly hits the spot. She asked for the recipe that night, and now it's become our winter tradition.
Ingredients
- Beef chuck, 2 lbs, cut into 1/2-inch cubes: This cut is essential—it has just enough marbling and connective tissue to become impossibly tender during the long simmer, creating that melt-in-your-mouth texture that defines great chili
- Olive oil, 2 tbsp: Use a good quality oil for browning; it creates the flavorful crust on your beef that adds depth to the entire pot
- Onion, 1 large, finely chopped: The foundation of your flavor base, these aromatics soften into sweetness as they cook
- Garlic, 3 cloves, minced: Add this after the onions to prevent burning, letting it perfume the oil without turning bitter
- Bell peppers, 1 red and 1 green, diced: The red adds natural sweetness, while the green brings a slight earthiness—together they create a beautiful color and flavor balance
- Jalapeño, 1, seeded and minced (optional): This is where you control the heat; remove the seeds if you prefer gentleness, keep them for a real kick
- Diced tomatoes, 2 cans (14 oz each): Choose cans with no added sugar, as the natural tomato flavor should shine through
- Kidney beans and black beans, 1 can each (15 oz): Always drain and rinse these to remove excess sodium and the starchy liquid that can make your chili taste canned
- Tomato paste, 2 tbsp: This concentrated flavor is your secret weapon—cook it briefly in the spices to deepen the umami
- Chili powder, 2 tbsp: The star ingredient; this is what gives chili its soul, so don't skimp on quality
- Ground cumin, 2 tsp: This earthy spice ties everything together and prevents the dish from tasting one-dimensional
- Smoked paprika, 1 tsp: A small amount adds complexity and a whisper of smokiness that makes people ask what your secret is
- Dried oregano, 1 tsp: This herb adds an herbaceous note that grounds the warmth of the other spices
- Cayenne pepper, 1/2 tsp: Start conservative and taste as you go; you can always add more heat, but you can't remove it
- Salt and black pepper: Season generously but taste before serving, as the flavors will concentrate as the chili reduces
- Beef broth, 2 cups: Use a quality broth—it becomes the soul of your pot, so homemade or low-sodium store-bought makes a real difference
Tired of Takeout? 🥡
Get 10 meals you can make faster than delivery arrives. Seriously.
One email. No spam. Unsubscribe anytime.
Instructions
- Brown your beef with intention:
- Heat your Dutch oven until you see the oil shimmer and just begin to smoke. Working in two batches, let the beef sit undisturbed for a few minutes on each side—this is how you get a proper golden crust. Don't stir constantly; let the Maillard reaction work its magic. Remove each batch to a plate, building those precious fond bits on the bottom of your pot that will add incredible depth.
- Build your flavor foundation:
- Return the empty pot to medium heat and add your onions. Listen for the gentle sizzle as they hit the hot surface; cook them patiently for 3–4 minutes until they turn translucent and begin to soften. Now add your minced garlic, diced peppers, and jalapeño. You'll smell the aromatics wake up immediately—this is the moment when your kitchen transforms.
- Bloom your spices:
- Add all your dry spices—chili powder, cumin, paprika, oregano, and cayenne—directly into the hot oil and vegetables. Stir constantly for about 1 minute. You'll notice the mixture becomes fragrant and almost paste-like; this is exactly what you want. The heat releases the essential oils in the spices, intensifying their flavors.
- Deepen with tomato paste:
- Stir in your tomato paste and keep stirring for another minute. This paste will caramelize slightly, adding a subtle complexity that most people can't quite identify but everyone tastes.
- Bring it all together:
- Return your browned beef to the pot, then add your diced tomatoes with all their juice, the beef broth, and your drained beans. Give everything a good stir, making sure no spices are stuck to the bottom. This is where all your elements become one unified pot.
- Let time do the work:
- Bring the chili to a boil—you'll see big, rolling bubbles breaking the surface. Then reduce the heat to low, cover with a lid, and let it simmer gently for 1 hour. Stir occasionally, just a few times, letting the beef become incredibly tender and the flavors meld.
- Thicken and finish:
- Remove the lid for the final 30 minutes. You'll notice the liquid gradually reduces and the chili becomes thicker and more concentrated. The beef should shred easily with a spoon when it's ready. Taste as you approach the end, adjusting salt and cayenne to your preference.
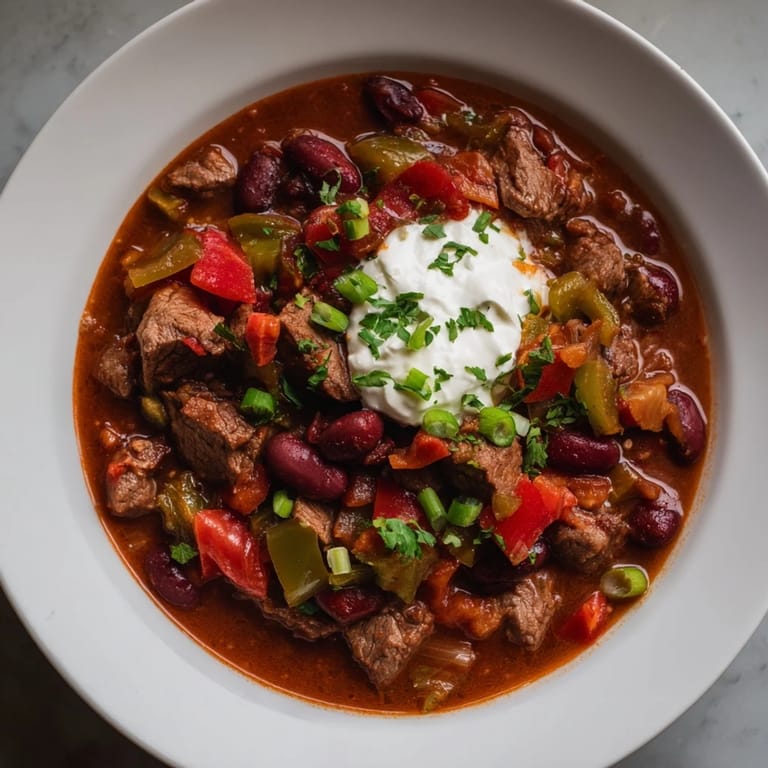 Pin it
 I learned the hard way that chili tells you when it's ready. Years ago, I'd set a timer and walk away, only to come back to meat that wasn't tender enough. Now I listen for the quiet simmer, watch how the beef responds to a gentle stir, and most importantly, taste it. That moment when you know—when the beef melts on your tongue and the spices have woven themselves into one cohesive, warming hug—that's when you know it's perfect.
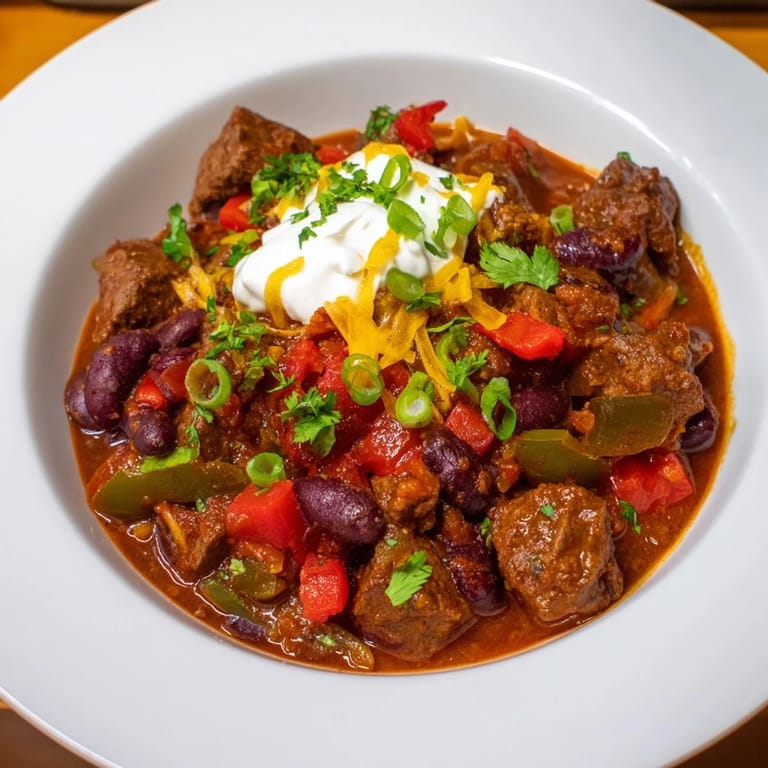
Serving Suggestions
This chili shines in so many ways. I've served it over rice for a heartier meal, spooned it into cornbread bowls for dinner parties, and eaten it straight from a mug while curled up on cold nights. Each topping changes the experience: a dollop of sour cream and fresh cilantro adds brightness, sharp cheddar melts into the warmth, and a squeeze of lime juice awakens everything. Let everyone build their own bowl—it becomes part of the experience, a moment where people make it theirs.
Making It Your Own
This recipe is your canvas. I've made it with ground beef when I was short on time, swapped the kidney beans for pinto beans when that's what I had, and once added dark chocolate—just a square melted in—because I'd read it deepened the flavors and it absolutely did. Some people add corn for sweetness, others load it with extra jalapeños for heat. The beauty of chili is that it's forgiving and welcomes your preferences. Start with this version, then make notes about what you'd change next time. That's how recipes become truly yours.
Storage and Reheating
This chili keeps beautifully in the refrigerator for up to 4 days, and it freezes magnificently for up to 3 months. I actually prefer reheating it gently over low heat, stirring occasionally, because the slow warmth coaxes even more flavor from every ingredient. Add a splash of broth if it's become too thick during storage—chili loves a little moisture.
- Refrigerator: Store in an airtight container and give it a gentle reheat on the stovetop
- Freezer: Freeze in portions for quick winter meals, thawing overnight in the fridge before reheating
- Slow cooker: Brown the beef and soften the vegetables first, then transfer everything to a slow cooker on low for 6–8 hours for hands-off cooking
 Pin it
 Chili con carne is more than just a recipe to me—it's a reminder that the simplest ingredients, treated with care and given time, become something that warms not just bodies but hearts. I hope this recipe becomes part of your winter tradition too.
Recipe FAQs
- → What cut of beef works best for this dish?
Beef chuck cut into cubes is ideal for slow simmering, yielding tender and flavorful meat.
- → Can I adjust the spiciness level?
Yes, omit or reduce the jalapeño and cayenne pepper for a milder taste.
- → What sides complement this stew?
Rice, cornbread, or tortilla chips pair well to balance the hearty flavors.
- → How long should the stew simmer?
Simmer covered for 1 hour then uncovered for 30 minutes to thicken and tenderize.
- → Are there suitable toppings to enhance it?
Options like shredded cheddar, sour cream, chopped cilantro, green onions, and lime wedges add freshness and richness.