 Pin it
 I'll never forget the Sunday afternoon when my neighbor burst through the kitchen door with a sheet pan quesadilla fresh from her oven, steam rising off the golden, crispy tortillas. One slice in, and I was hooked—the way the cheese melted into every corner, how the seasoned meat and vegetables created this perfect harmony of flavors and textures. That moment sparked a kitchen obsession that's made countless weeknight dinners feel like celebrations. Now, whenever I need to feed a crowd without spending hours at the stove, this is my go-to recipe.
I remember making this for my daughter's birthday party, worried I'd need to cook something fancy. Instead, I pulled these sheet pan quesadillas out of the oven, cut them into neat squares, and watched every kid grab three pieces before running back outside. Their parents asked for the recipe too. That's when I knew this had become more than just dinner—it was a trusted friend in the kitchen.
Ingredients
- Ground beef or chicken (500 g / 1 lb): The foundation of your filling—ground chicken gives a lighter touch while beef adds richness. Brown it well to build flavor, but don't overwork it into tiny bits; you want some texture.
- Olive oil (1 tbsp): Just enough to get the meat cooking without making everything greasy; this is the anchor for all your flavors.
- Red bell pepper (1 medium, diced): Adds sweetness and visual pop—I've learned that cutting it evenly helps it cook at the same pace as the onions.
- Yellow onion (1 medium, diced): The aromatic backbone that makes everything smell like home; don't skip the sautéing step or they'll taste sharp.
- Corn kernels (150 g / 1 cup): Fresh, frozen, or canned all work beautifully—frozen actually releases its sweetness as it thaws into the hot filling, a trick I discovered by accident.
- Garlic (2 cloves, minced): Always mince fresh garlic; it changes everything about how the spices bloom and taste.
- Jalapeño (1, seeded and finely chopped, optional): Seeds hold the heat—remove them if you prefer gentle warmth, keep a few if you like a kick that builds.
- Ground cumin (1½ tsp): The soul of Mexican-American food; toasting it briefly in the spices creates a deeper, more complex flavor.
- Smoked paprika (1 tsp): This gives you the whisper of smoke without an actual fire—transformative, really.
- Chili powder (1 tsp): Builds layers of warmth; I always taste the filling after adding spices because every brand is slightly different.
- Dried oregano (½ tsp): A quieter player that ties everything together; dried oregano is stronger than fresh, so measure carefully.
- Salt and black pepper (1 tsp salt, ½ tsp pepper): Season as you go, tasting at the end—you can always add more, but you can't take it back.
- Large flour tortillas (12, approx. 25 cm / 10-inch): The structure of your creation—thicker tortillas hold up better than thin ones when you're folding and baking.
- Shredded cheddar or Mexican blend cheese (300 g / 3 cups): The glue that holds everything together and creates those crispy, golden edges I dream about; don't buy pre-shredded if you can help it, as it melts less evenly.
- Melted butter or neutral oil (2 tbsp, for brushing): This is what creates that irresistible golden crust—brush generously, especially on the edges where you want maximum crispiness.
Tired of Takeout? 🥡
Get 10 meals you can make faster than delivery arrives. Seriously.
One email. No spam. Unsubscribe anytime.
Instructions
- Set your oven and prep your pan:
- Preheat your oven to 200°C (400°F)—this high heat is your secret to crispy edges and melty centers. Grab your largest rimmed sheet pan and give it a light spray of nonstick spray or a thin coating of oil. A pan that's too small means crowded tortillas that won't crisp properly.
- Brown the meat with intention:
- Pour olive oil into a large skillet over medium heat and let it shimmer for a moment. Add your ground meat and break it apart with a wooden spoon as it cooks, about 5 minutes. You're looking for no pink remaining, with the meat developing little browned bits—that's where all the flavor lives. Drain excess fat if needed.
- Build the flavor base:
- Add your diced onion, bell pepper, corn, and jalapeño to the cooked meat. The sizzle that happens is music to my ears. Stir everything together and let it sauté for 3 to 4 minutes, until the vegetables soften and release their sweetness.
- Awaken the spices:
- Stir in the minced garlic and watch as it perfumes the entire skillet in seconds. Add cumin, smoked paprika, chili powder, oregano, salt, and pepper. Cook for just 1 more minute—this brief time allows the spices to bloom and deepen without burning. Taste it now; this is your moment to adjust seasonings before everything bakes.
- Layer the foundation:
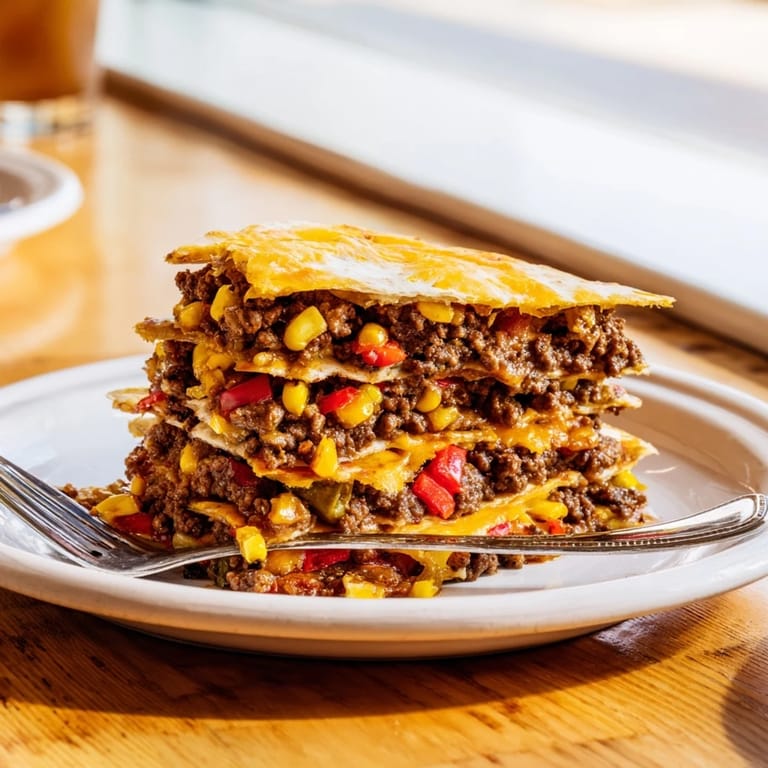
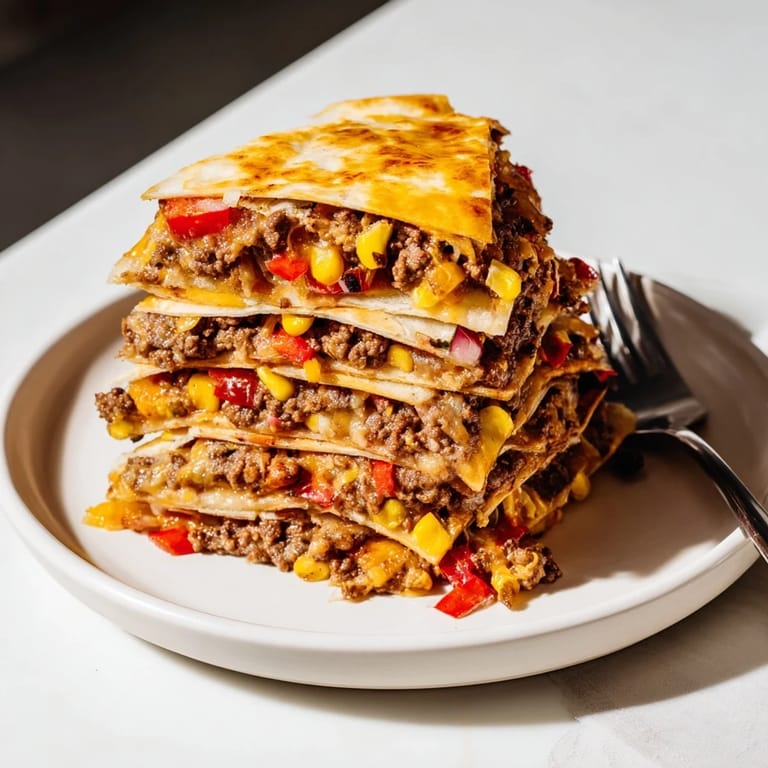
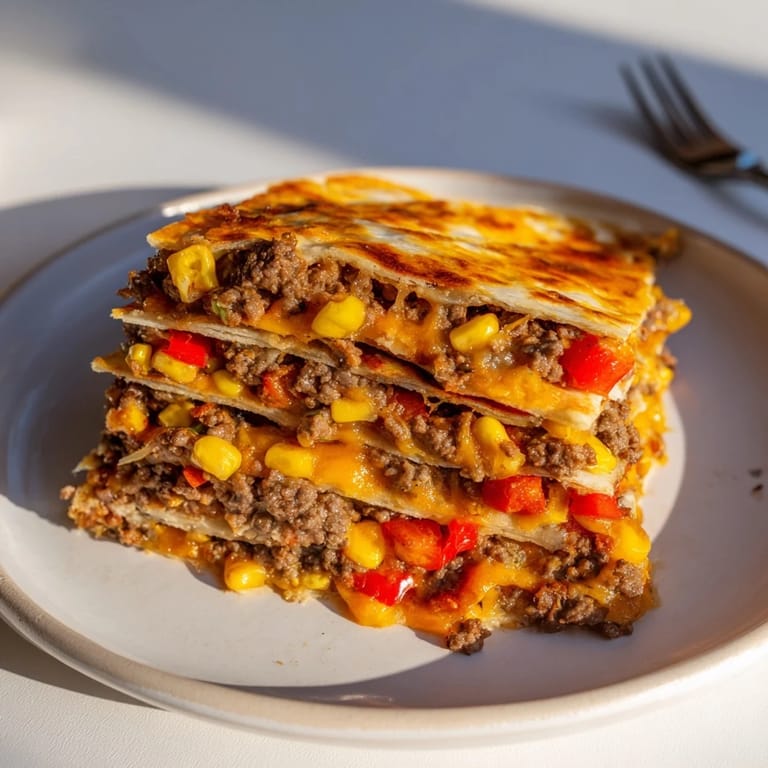
- Take 6 tortillas and arrange them overlapping around the edges of your sheet pan so that about half of each tortilla hangs over the side of the pan. Leave the center of the pan exposed. Now place 1 tortilla in the very center. You're creating a frame that will fold up and over.
- Fill with the meat mixture:
- Spread your warm meat and vegetable mixture evenly over all the tortillas, working from the edges toward the center. This even distribution is what makes every bite taste right. Don't overfill or your quesadilla will burst when it bakes.
- Crown with cheese:
- Sprinkle the shredded cheese generously over the filling. This is not the time to be shy—the cheese is what creates those crispy, golden bits you'll find yourself reaching for long after dinner is done.
- Fold and seal:
- Place another single tortilla in the center, then carefully fold each of the overhanging tortillas over the filling, tucking them under as you go, like you're wrapping a present. Each fold creates another layer of crispy tortilla.
- Brush for golden perfection:
- Using a pastry brush, coat the entire top with melted butter or neutral oil. Don't skip this step—it's what transforms these from baked to gorgeously golden.
- Press and bake:
- Place another sheet pan directly on top and press down gently—this helps everything bake evenly and keeps the filling contained. Bake for 15 minutes, then carefully remove the top pan and bake for another 5 minutes until the edges are deep golden and crispy.
- Rest and serve:
- Let your creation rest for 5 minutes out of the oven; this sets everything and makes cutting much cleaner. Slice into squares and serve with your favorite toppings—sour cream, salsa, guacamole, or fresh cilantro all transform this into something even more special.
 Pin it
 I made these for my parents last month, and my father—who never asks for recipes—called me the next day asking if I could teach him. Watching him cut into that first piece and taste the combination of crispy tortilla, melting cheese, and savory filling, I saw his expression shift into pure joy. That's when I understood that cooking isn't really about feeding people; it's about creating moments they'll remember.
Customizing Your Quesadilla
One of my favorite discoveries about this recipe is how easily it adapts to what's in your kitchen. I've made it vegetarian by swapping the ground meat for drained canned black beans, adding them right after the spices—the result is just as satisfying and stretches the dish further. Spinach, mushrooms, and zucchini all disappear beautifully into the filling without changing the cooking time. For spice lovers, increase the chili powder or stir a few tablespoons of hot sauce right into the filling before assembly. I once added crispy bacon pieces and caramelized onions, and my dinner guests actually argued about who got the last slice. The beauty is that the basic technique stays the same while the flavors can be completely reimagined.
Pairing and Serving Ideas
These quesadillas are naturally generous and filling, so I've learned to keep accompaniments simple and refreshing. A crisp Mexican lager or lime-infused sparkling water cuts through the richness of the cheese beautifully. I serve them with a simple lime wedge, extra salsa on the side, and sometimes a quick lime crema made from sour cream, lime juice, and a pinch of salt. The brightness of these elements against the warm, savory quesadilla creates a balance that feels complete. Roasted black beans on the side add earthiness without heaviness, and a simple green salad keeps everything feeling fresh.
Making It Work for Your Kitchen
The reason this recipe has become my most-requested is because it scales effortlessly and requires almost no special equipment. Use whatever sized sheet pan you have—if it's smaller, just be more careful with overlapping, and if it's larger, you have more room to work. I've made these in dorm kitchens, tiny apartments, and sprawling family homes, and the technique remains the same. The most important thing I've learned is that this dish teaches you how to layer flavors and work with heat in ways that apply to dozens of other recipes.
- If your filling seems too wet, let it cool slightly before adding to tortillas—excess moisture creates steam that prevents crispiness.
- Brush the butter on while the pan is still warm from the oven for better absorption and golden color.
- Leftovers keep beautifully and reheat wonderfully in a 175°C (350°F) oven for about 10 minutes.
 Pin it
 This sheet pan quesadilla recipe has become part of my kitchen identity—the dish I make when I want to feel capable and generous all at once. It's simple enough that anyone can do it, yet somehow it always feels like a victory when it comes out of the oven golden and perfect.
Recipe FAQs
- → Can I make this dish vegetarian?
Yes, you can substitute the ground meat with drained canned black beans to keep it flavorful and hearty.
- → What vegetables work best in the filling?
Diced bell peppers, onions, corn, and jalapeños provide color and flavor, but you can also add spinach, mushrooms, or zucchini.
- → How do I ensure the tortillas get crispy?
Brushing the top with melted butter or oil and baking uncovered helps achieve a golden, crisp texture.
- → Can I prepare this ahead of time?
Yes, assemble the dish ahead and refrigerate it; bake just before serving to maintain freshness and texture.
- → What are suitable toppings for this dish?
Sour cream, salsa, guacamole, and chopped cilantro add complementary flavors and freshness when served on top.