 Pin it
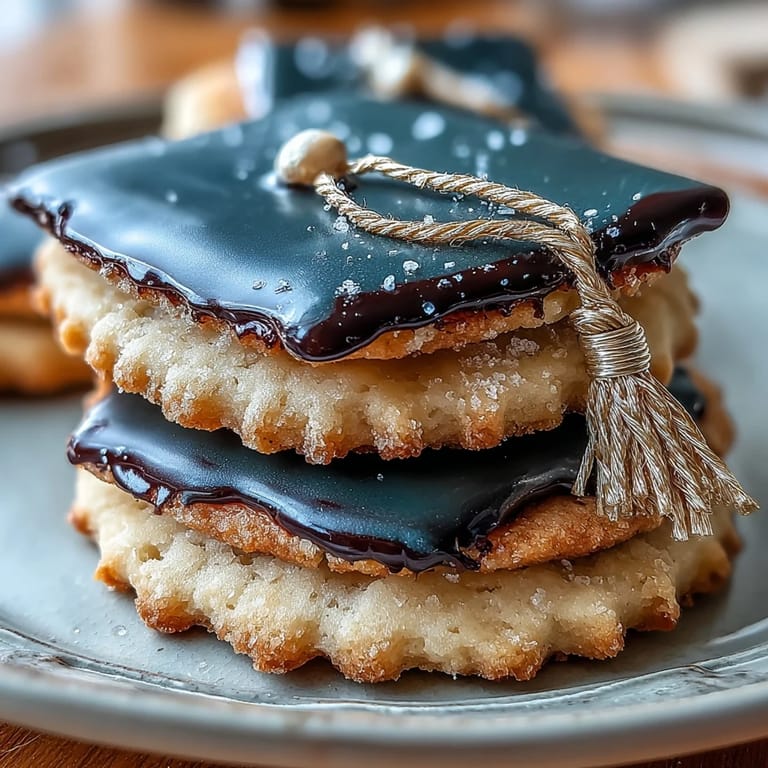
 The first time I made these diploma and graduation cap cookies, the kitchen felt more like an art studio than a bakery—the kind of project where you lose yourself piping details and painting gold accents, music playing softly in the background. It was late spring, the sun sticking around in the early evening, and the golden shimmer of the luster dust caught every last ray in the room. I remember the gentle clink of cutters against the countertop and how even a humble sugar cookie can be transformed with a little icing magic. There’s something about creating celebration treats for someone’s big day that has its own special energy. Watching a plain cookie take shape as a miniature diploma or cap always makes me laugh at how serious everyone becomes about ‘not smudging the tassels!’
These cookies became a mini-assembly line on my cousin’s graduation day—we had parents painting gold ribbons, teenagers carefully outlining caps, and everyone sneaking tastes of extra icing. It turned a simple dessert into one of those rare group efforts where every imperfection made them feel more personal. My aunt joked that the bumpy diploma was ‘definitely for the class clown.’
Ingredients
- All-purpose flour: I learned that sifting before measuring keeps the cookies especially tender and fluffy.
- Unsalted butter: Letting it reach room temperature fully makes creaming with sugar effortless and gives the best texture.
- Granulated sugar: Creaming this thoroughly creates the classic sugar cookie crunch along the edges.
- Large egg: A fresh egg helps bind everything and gives the dough its rich flavor.
- Pure vanilla extract: Never underestimate the magic of spending a little extra for real vanilla flavor.
- Almond extract (optional): Adds a light cherry-like aroma that pairs so well with the gold icing—but lemon can work for a brighter twist.
- Salt: Even in sweet baking, a little salt sharpens every flavor note and balances the sweetness.
- Powdered sugar: Sifting ensures smooth, lump-free icing every time.
- Egg whites or meringue powder: Both whip up glossy; I swap based on mood and convenience.
- Cream of tartar: The secret for loftier, more stable royal icing peaks that won’t deflate while decorating.
- Black gel food coloring: Just a drop gets dramatic cap colors—liquid food coloring would thin the icing too much.
- Gold edible luster dust: Mixing with a splash of clear alcohol or lemon extract gives maximum sparkle on all the tiny tassels and ribbons.
Tired of Takeout? 🥡
Get 10 meals you can make faster than delivery arrives. Seriously.
One email. No spam. Unsubscribe anytime.
Instructions
- Cream the Butter and Sugar:
- Let the mixer run until the butter is so pale and fluffy it almost glows, and scrape down the sides to make sure nothing’s lurking at the bottom.
- Add Eggs and Extracts:
- Beat in the egg and vanilla (plus almond or lemon if you like) until just combined—the mixture will smell like bakery heaven.
- Combine Flour and Salt:
- Tip the flour and salt in gradually; mix only until a dough comes together, or the cookies might end up tough.
- Chill the Dough:
- Split the dough in half, wrap each half snugly in plastic, and let them chill in the fridge for 45 minutes—enough time for a quick kitchen dance break.
- Roll and Cut Shapes:
- Dust the surface with flour, roll the dough to 1/4-inch, then press out diploma and cap shapes, collecting and re-rolling scraps as needed.
- Bake:
- Arrange cookies on a parchment-lined sheet, giving them a bit of breathing room, and bake at 350°F just until edges turn golden—don’t let them brown too much.
- Prepare Royal Icing:
- Whip egg whites to frothy peaks, then gradually beat in sifted powdered sugar and cream of tartar until the icing forms glossy peaks; stir in the vanilla last.
- Tint and Portion Icing:
- Divide icing between bowls: one for rich black caps, one left white for diplomas, and a bit set aside for gold painting later.
- Decorate Cookies:
- Fill piping bags and outline, flood, and detail each cookie—patience pays off here, and mistakes can usually be fixed with a wet toothpick.
- Add Gold Accents:
- Stir gold luster with a few drops of alcohol or lemon extract, then carefully paint tassels and ribbons with a fine brush; let everything dry before stacking or serving.
 Pin it
  Pin it
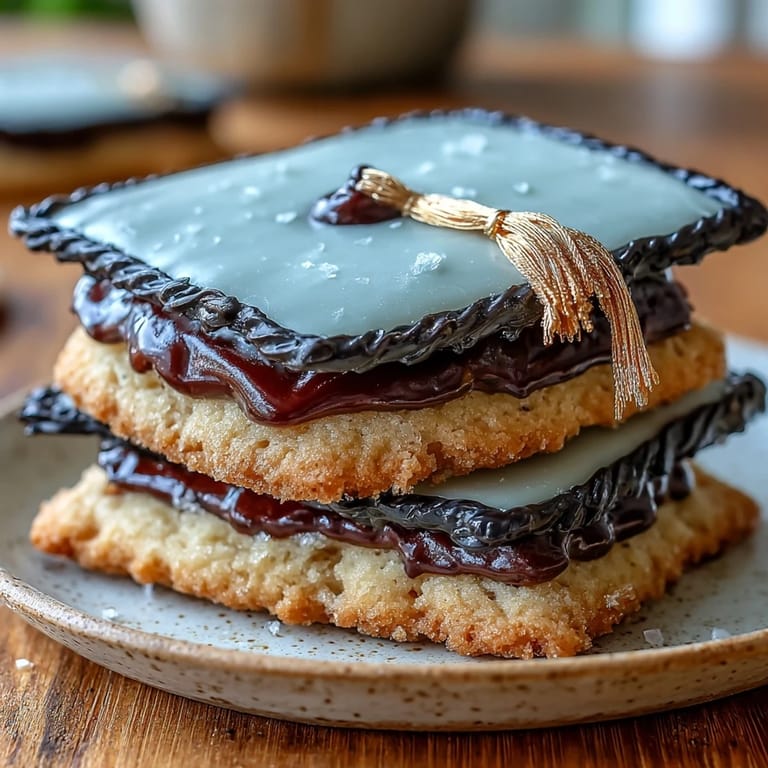
 I’ll never forget my nephew lining up the finished cookies on the kitchen counter, naming each cap after relatives—some lucky, some just goofy. He insisted on giving the shiniest diploma to his grandmother, who took a bite and declared it was the sweetest graduation present she’d received all day.
Tips for Shaping and Decorating
Cookie cutters with sharp edges made the cleanest shapes, but don’t stress—any wobbles look charming once the icing goes on. I learned to use a toothpick to nudge royal icing right up to the edge for crisp outlines. Working in small batches keeps the dough at the perfect temperature and makes it easier to re-roll scraps without overworking. The best decorating moments often come from letting friends pitch in, whether or not you end up with picture-perfect results.
Make-Ahead and Storage Insights
When I made these cookies in advance for a big celebration, I realized quickly that airtight containers keep them just as fresh for a week. Layering cookies between sheets of parchment prevents smudged icing, and letting each batch dry overnight guarantees flawless stacking. Sprucing up a basic cookie tin with a ribbon instantly turned my leftovers into a thoughtful gift for a neighbor or teacher.
Bringing the Gold Details to Life
Mixing the luster dust with a splash of lemon extract rather than vodka left the kitchen smelling bright and citrusy. Painting the gold accents became my favorite final step—every brushstroke felt like a celebration. If you need to hurry, use a desk fan to dry those shiny edges gently.
- Test the gold paint on parchment before you brush the cookies.
- Clean your fine brush thoroughly between uses for crisp lines.
- Always wait until icing is bone dry before adding gold details.
 Pin it
  Pin it
 Handing out these gilded cookies always starts conversations at the party table. Even after the last cap disappears, I’m still finding specs of gold dust in the kitchen sink for days—a sweet little reminder of celebration.
Recipe FAQs
- → How do I get royal icing to hold fine details?
Beat egg whites (or meringue powder + water) with sifted powdered sugar and cream of tartar until stiff, glossy peaks form. Use a thicker pipe consistency for outlines and small details, thinning with drops of water for flooding. Allow outlines to crust before filling for crisp edges.
- → What baking time and temperature work best?
Preheat to 350°F (175°C). Bake cut cookies 8–10 minutes or until edges are just golden; this keeps centers tender while the edges set for decorating.
- → How can I prevent cookies from spreading?
Chill the dough discs, roll to 1/4-inch, and chill cut shapes on the sheet for a few minutes before baking. Avoid overworking the dough and use a light dusting of flour when rolling to minimize spread.
- → What's the best way to apply the gold accents?
Mix edible gold luster dust with a few drops of clear alcohol or lemon extract to make a paint, then use a fine food-safe brush to add highlights to tassels and ribbon. Apply only after icing has set to avoid bleeding.
- → Can I make these ahead and how should I store them?
You can bake and decorate in advance. Once the icing is completely dry, store cookies in an airtight container at room temperature for up to one week. Separate layers with parchment to protect decorations.
- → Are there easy ingredient swaps for allergens or flavor variations?
For the royal icing, meringue powder plus water can replace raw egg whites. Swap almond extract for lemon for a brighter note. Note that the dough contains eggs, butter and wheat; adjust accordingly for dietary needs.