 Pin it
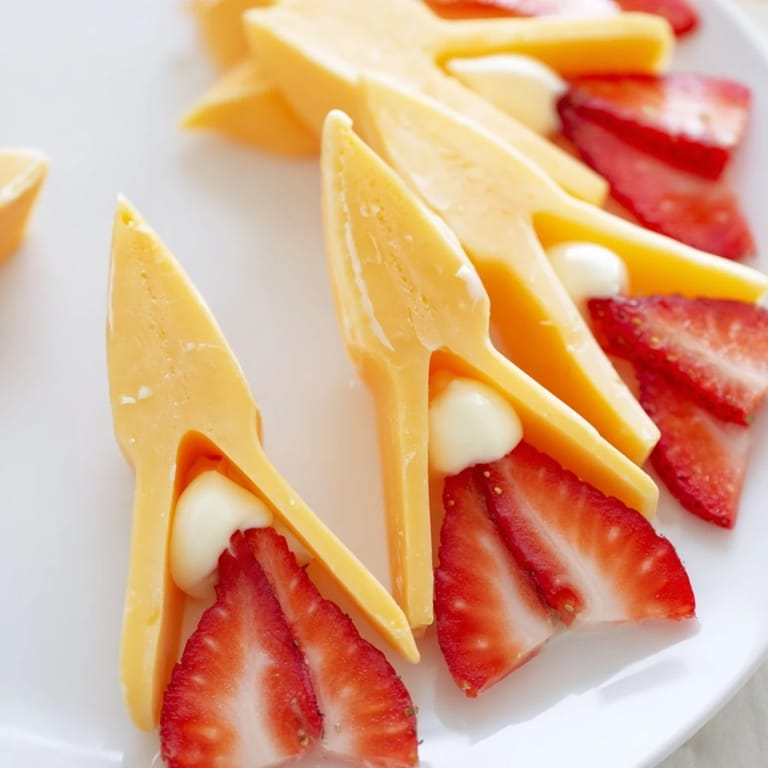
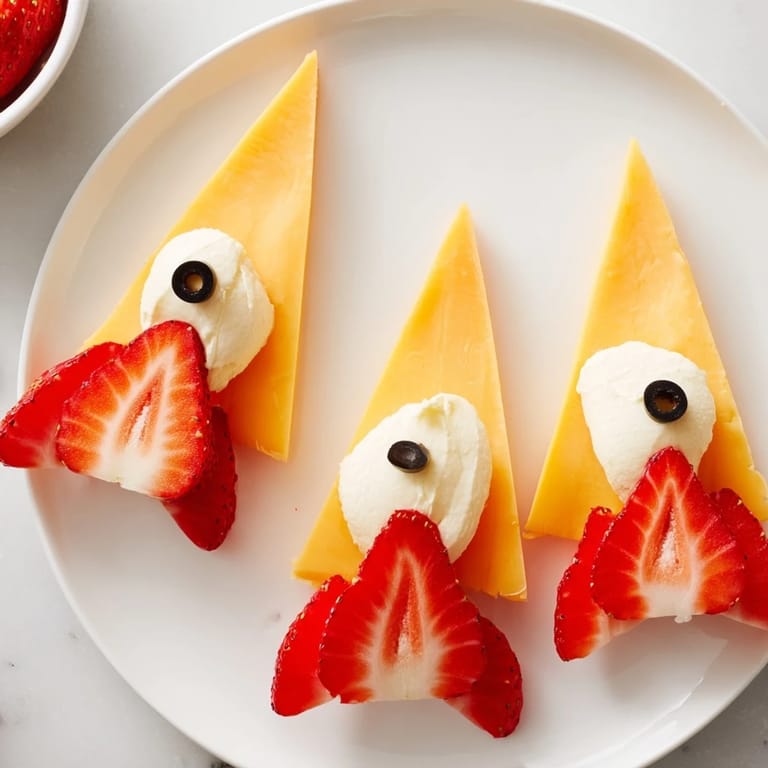
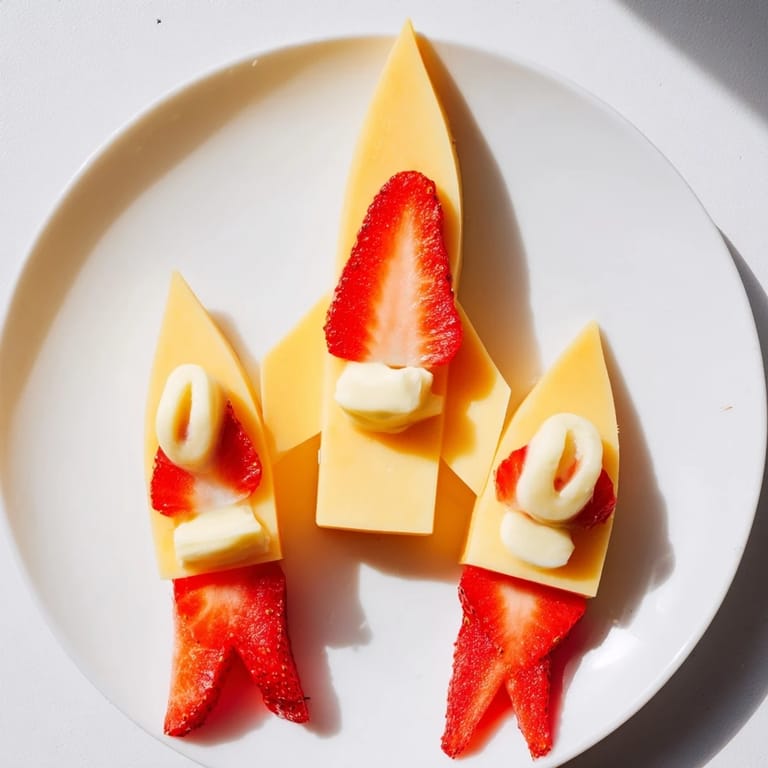
 My daughter came home from school buzzing about a rocket ship project, and I realized I had a chance to turn snack time into something magical. Rummaging through the fridge, I spotted sharp cheddar wedges and strawberries, and suddenly this whimsical creation took shape on our kitchen counter. What started as a playful idea became the most requested thing I've made all season, and now every time someone asks for "that rocket thing," I smile remembering the moment it all clicked into place.
The first time I brought this to a potluck, I watched parents literally pause mid-conversation when they spotted it. Kids started pointing and asking questions, and suddenly I wasn't just offering snacks—I was sparking imagination. That's when I knew this wasn't just about cheese and fruit; it was about the moment when food becomes a talking point.
Ingredients
- Sharp cheddar cheese, cut into pointed wedges (200g): The star of the show—those angular wedges create the rocket's sleek body, and the sharpness keeps the whole platter from feeling too sweet.
- Cream cheese (100g, optional): A kitchen secret that acts like edible glue, holding those wedges steady without anyone noticing the scaffolding beneath the magic.
- Fresh strawberries, hulled and sliced lengthwise (200g): Slicing them lengthwise creates those dramatic flame shapes that make people gasp when they see it.
- Black olives, sliced (1 tablespoon, optional): They become tiny porthole windows that give the rocket personality and character.
- Fresh mint leaves (1 tablespoon, optional): A pop of green that feels intentional and adds that garden-fresh touch.
- Thin carrot sticks (2–3, optional): These become the rocket fins if you want to lean into the design, though they're totally optional.
Tired of Takeout? 🥡
Get 10 meals you can make faster than delivery arrives. Seriously.
One email. No spam. Unsubscribe anytime.
Instructions
- Build your rocket body:
- Arrange those cheddar wedges in a pointed formation on your platter, overlapping them slightly like roof shingles so they nestle together naturally. Think of it like you're creating a sleek silhouette that tapers to a point at the top.
- Add your adhesive layer:
- If your wedges feel wobbly, dab a tiny bit of cream cheese between them to lock everything in place—just enough to stabilize, not so much that it shows. This is your secret structural support system.
- Create the flame effect:
- Fan out those strawberry slices at the base of the rocket, arranging them so they cascade outward like they're exploding with energy. The longer slices create more dramatic flames than smaller pieces.
- Add personality with details:
- Press olive slices onto the cheese wedges to create windows or decorative touches that make it feel like a real spacecraft. Let your imagination lead here—there's no wrong way to accessorize.
- Final flourishes:
- Tuck carrot sticks along the sides for fins if you're going for full design mode, and scatter mint leaves around for that fresh green accent. Then step back and admire what you've created.
- Timing is everything:
- Serve it right away while everything is crisp and the colors are vibrant, or cover it loosely and refrigerate until you're ready to present—it holds up beautifully for a couple hours.
 Pin it
 My nephew asked if he could take a photo before eating it, and I realized that this snack had transcended being just food—it had become a moment worth preserving. That's when I understood why people love creating with what's in their kitchen.
Cheese Selection Matters More Than You Think
I started experimenting after that first success, and discovered that different cheeses create different visual effects. A creamy Gouda gives you golden tones, while Swiss brings elegant holes that look like ancient spacecraft windows. The color and texture you choose fundamentally changes how the rocket feels, so don't think of cheese as just one ingredient—it's your design palette.
Making It Your Own
Once you nail the basic rocket, the variations are endless and honestly more fun than following the original. I've done mango flames for a sunset effect, used pepper slices for a spicy rocket, and even arranged dark grapes alongside the strawberries for a cosmic vibe. Each version tells a different story and keeps the idea fresh every time you make it.
Serving and Pairing Ideas
The Retro Rocket shines brightest when it's part of a bigger snack board rather than standing alone. Surround it with crackers, breadsticks, and maybe some hummus or dips so people have options, and suddenly you've created an experience rather than just served food. The rocket becomes the showstopper while everything else supports it.
- Set out soft crackers nearby so people can build little cheese and fruit bites if they want something sturdier.
- A small bowl of honey or jam nearby creates an unexpected flavor pairing that people discover and love.
- Remember that this works for breakfast platters, lunch boxes, and late-night snacking—it's endlessly versatile.
 Pin it
 This rocket teaches you something every kitchen needs to remember: the most impressive things are often the simplest. No recipes, no cooking, just imagination and what you already have on hand.
Recipe FAQs
- → How do I keep the rocket shape stable?
Overlap the sharp cheddar wedges slightly and use small dabs of cream cheese between them to secure the formation.
- → Can I substitute the strawberries with other fruits?
Yes, mango or orange slices create a similar fiery flame effect with different vibrant colors.
- → Are there options to decorate the rocket further?
Black olive slices can represent windows, while carrot sticks and fresh mint leaves add fins and color accents.
- → Is this suitable for vegetarians and gluten-free diets?
Yes, all ingredients are vegetarian and gluten-free, but check cheese labels for potential cross-contamination.
- → What tools are recommended for assembling the platter?
A sharp knife for cutting cheese, a large serving platter for arrangement, and a small spoon for spreading cream cheese are helpful.